

How To Make Your Own Leather Holiday Ornaments
The holidays are getting closer every minute!
Are you looking for a kids craft projects to keep little hands busy over winter break?
A DIY leather project that will make great handcrafted gifts and stocking stuffers?
Or maybe just some craft ideas for the leather scraps you have sitting around?
Either way, you've come to the right place!
We were inspired by the vast amount of paper craft ornaments there are out there on the internet. Many of them looked like they would be fairly easy to make out of leather instead of paper, and since we are just swimming in leather here, we gave it a shot!
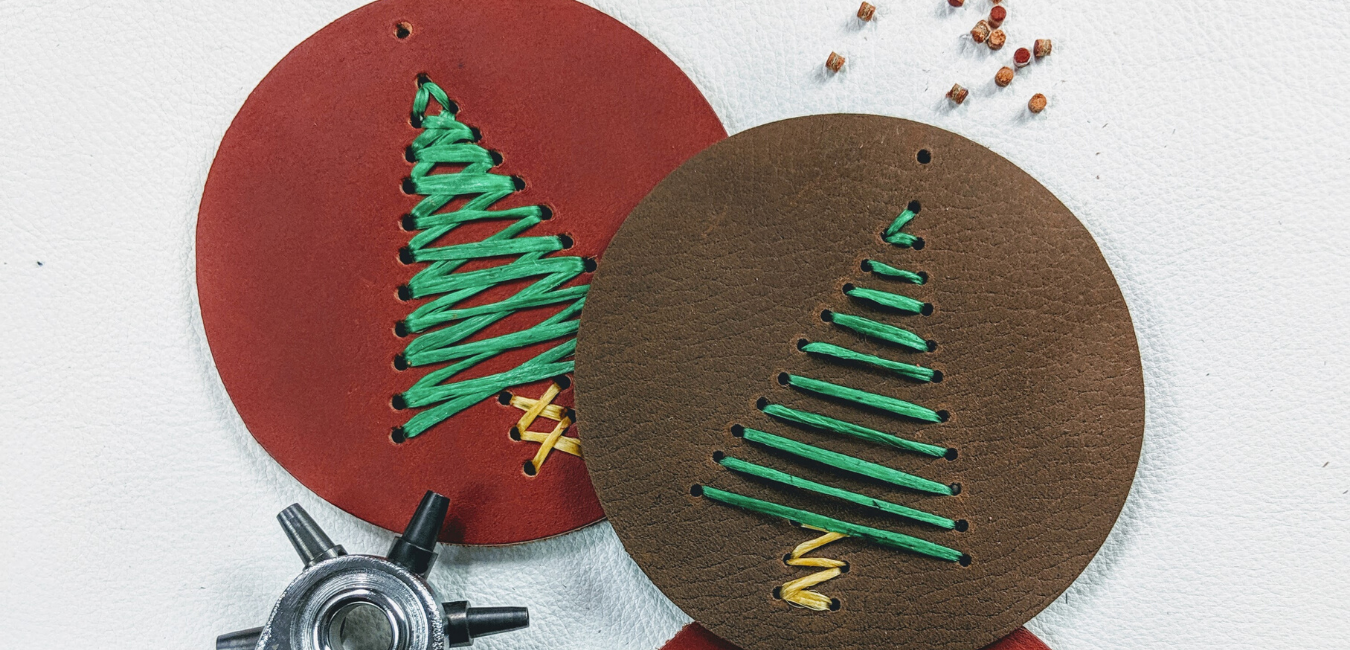
Embroidered Leather Ornaments
This leather craft is great for the leatherworking novice. You can buy the leather already cut into rounds (they’re usually meant to be used as leather coasters) and print off some fun patterns you want to recreate.
Or, if you are a little more experienced, you can cut the leather yourself into whatever shapes you choose and design your own patterns to adorn your ornaments.
However you choose to make these tree ornaments, here are the items you will need to get it done:
A sheet of Paper or Cardstock for your templates
Pen/Pencil
Ruler
Artist Tape or Clothespins
4" inch rounds of Leather in semi-stiff to stiff temper (these will be available pre-cut on the website next week)
Let’s get started!
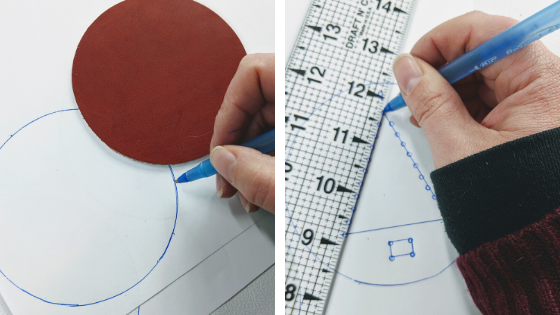
Your first step is to make your template. Trace around your leather so you have an accurate space to draw your pattern in. In this case, we are doing a simple Christmas Tree pattern that requires nothing more than a triangle and rectangle.
Using your ruler, space out where you want your hole punches to go. I wanted them to on the same level, so I spaced them 1/4" apart down the length of the triangle portion of the tree.

When you are happy with the layout of your design, cut out your template.
Place your template on top of your piece of leather. Try your best to center your design. Once you have your template where you want it, you'll need to keep it in place so that you can start punching out your design.
I used a mix of artist's tape and a clothespin. As you bend and flex your leather, the tape can begin to come loose, so having that pin in place helps keep your template lined up. Be mindful of the tape on leather. It can leave a residue if you are not using the right kind.

When your template is secure, go ahead and start punching right through your template. Line up your punch over your marks and you are good to go!
When you are done punching holes on this first ornament, you'll be able to recreate the exact same shape over and over again since you'll have the pre-punched holes to line up with.
Lift up a corner, and check that you've made all the punches you need to. If you have, remove the template and move on to threading your Christmas ornament!

Choose the color you want to start with. In this case, I am going green, since its a pine tree and all.

You can thread the sinew through in any pattern you wish. Here I replicated a cross-stitch. If you want to mix colors together or thread it willy nilly, it is totally up to you. This is the time to get creative!

Once you've got your design exactly how you want it, be sure to tie off the sinew in the back. You can use a match or a lighter to melt the ends together to ensure they stay put for good. If you don't want to use fire, knot them tight and press them down with your finger. Sinew is very malleable and will smooth right down.
And there you have an embroidered leather ornament. Try out some different shapes and color combinations. You can see I did a snowflake as well, but the options are really limitless. You could add names or dates with some more embroidery or even with some leather paint.
If you want a more finished back, you could glue two ornaments together for a double sided piece or glue some holiday fabric to add an extra pop!
Onion Bulb Ornaments
These ornaments are still a great kids craft but may require a little more help from the adults for the younger kids of the group since you’ll be using sharp cutting implements.
Here’s what you will need for these ornaments:
Rotary Cutter or Utility Knife (if you have a Cricut or Silhouette, you can use these instead)
Chicago Screws
Screwdriver
Leather Paint or Dye (optional)
Let’s get started!
You will need to determine how tall you want your ornament to be. This will dictate the size of the center strip of leather that all the other pieces will attach to! Make one out of paper first to figure out your preferred sizes. Then you also have templates to work with!
For the smaller sized onion, I started with a single 3 inch piece, then added an inch for each layer. So the middle strips are 4 inch and the outer strips are 5 inch long. All of the strips are the same width at ½”.
If you want the bulb to stick out further, add more length to your outer layer strips. For a larger sized onion, I used 5 inch, 7 inch, and 9-inch strips, but maintained the ½ inch width.

When your strips are cut, you can stack them to punch the hole for your hardware. I like to stack them because it ensures the punch is going through the same spot on each strip and keeps them even.
Depending on how thick of leather you are using, you may not be able to go through all the layers, so adjust your stack to accommodate your punch!
Make sure you are using the right size punch for your Chicago screw. I keep a template attached to my punch so I can check my hardware before punching into my project.
If you’ve decided to paint or decorate the leather, now would be the time to do it before you begin assembling the ornament. If you want to know a bit more about painting leather, check out this previous blog of ours!

Start threading your female side of the screw through the holes. Once it is through all your layers, grab your screwdriver and tighten the male side of the screw. If you want this to be permanent, you can add a small amount of super glue to the inside of the screw and that will keep it secure forever.

Add an ornament hook or a piece of string so that you can hang this ornament from your tree, and you’ve got a lovely ornament to pass down or gift.
Layered Heart Ornament
This ornament is very similar to the onion ornament as far as the process goes! Just like the onion, you’ll need to decide how large you want the shape to be in order to determine how long your leather strips will need to be. You’ll also need all the same tools and supplies listed above.
For mine, I cut my outside strips to 8 inches in length with a width of a ½ inch. The inside strips were cut to 5 inches in length, also with a width of ½ inch.

To punch the holes for my hardware, I looped the leather strips so the ends were even, and used my punch to cut through both ends, ensuring the holes were even. I then used that strip as the template to punch the holes in the rest of my strips.

After the holes are punched, start working your leather onto the Chicago screw. Loop the first two strips on, then follow with the second two strips and you should have a heart shape, just like I’ve shown below!
Grab your screwdriver and screw in the male half of the screw to set the piece. Again, you can make this a permanent bond if you apply a little super glue inside the screw.

To add your hanging loop, take your string, ribbon, or sinew, and glue it down in the valley of your heart shape. You may want to use a clothespin to hold the loop and leather in place until the glue has set.
We hope you enjoy making these easy crafts! Use them as gift tags, tree decorations, or even gifts. Create your own designs or use ours for inspiration!
Share your finished ornaments on social media and tag us with #theleatherguymn and we may even share them! Thanks for visiting!